Mastering DIY Plumbing: Essential Tools & Techniques for Homeowners
As a homeowner, the thought of a plumbing emergency can be daunting. A leaky faucet, a clogged drain, or a running toilet often sends shivers down the spine, immediately followed by the urge to call a professional. While there are certainly times when a licensed plumber is indispensable, many common household plumbing issues can be tackled with a little knowledge, the right tools, and a healthy dose of confidence. This comprehensive guide is designed to empower you with the DIY plumbing essentials, equipping you to handle minor repairs and maintenance tasks, saving you time, money, and the stress of waiting for a professional.
Understanding the basics of your home’s plumbing system is the first step towards becoming a capable DIY plumber. Your home’s plumbing is a complex network of pipes, fixtures, and appliances designed to deliver fresh water and remove wastewater efficiently. Familiarizing yourself with shut-off valves, both for individual fixtures and your main water supply, is paramount. Knowing how to quickly cut off the water supply can prevent extensive damage in the event of a burst pipe or major leak. This foundational knowledge, combined with a well-stocked toolbox, forms the bedrock of successful DIY plumbing projects.
Understanding Your Home’s Plumbing System
Before diving into specific repairs, it’s crucial to have a general understanding of how your home’s plumbing operates. Essentially, there are two main systems: the supply side and the drain-waste-vent (DWV) side.
- Supply Side: This system brings fresh, potable water into your home. It typically starts from your municipal water supply line or well, passes through a main shut-off valve, and then branches out to various fixtures like sinks, showers, toilets, and appliances. Water pressure is maintained by the municipal system or a well pump.
- Drain-Waste-Vent (DWV) Side: This system is responsible for removing wastewater and sewage from your home. Gravity plays a significant role here, as waste flows downwards through a network of sloped pipes to the main sewer line or septic tank. The vent system, which typically extends through your roof, allows air into the drainage pipes, preventing a vacuum from forming and ensuring smooth wastewater flow.
Knowing the difference between these two systems helps you diagnose problems more effectively. For instance, a leak on the supply side will often involve pressurized water spraying, while a clog on the DWV side will result in slow drainage or backups.
Advertisements
The DIY Plumbing Essentials: Your Go-To Tool Kit
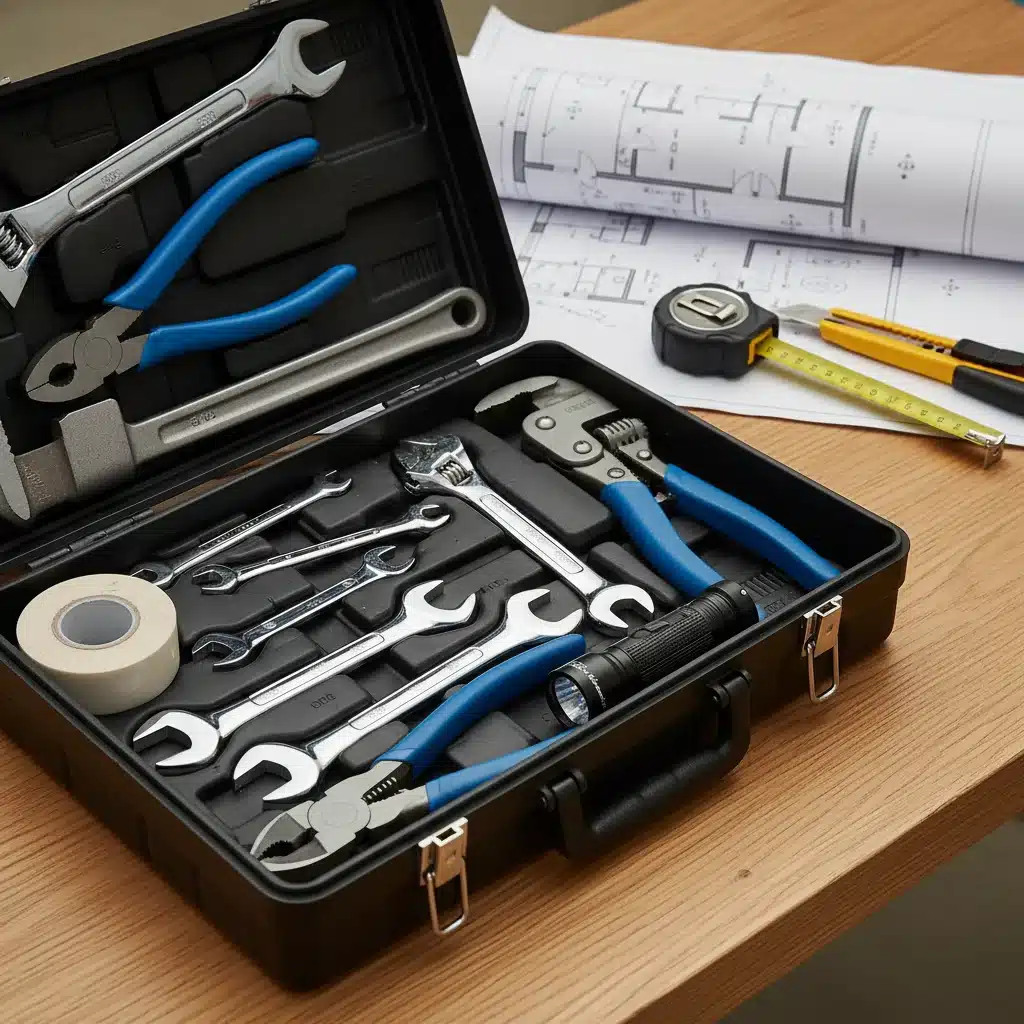
A successful DIY plumbing job begins with having the right tools. Investing in quality tools will not only make your tasks easier but also ensure safer and more effective repairs. Here are the DIY plumbing essentials every homeowner should have:
Wrenches
- Pipe Wrench: Indispensable for gripping and turning pipes and fittings. A 10-inch and a 14-inch pipe wrench are good starting points.
- Adjustable Wrench: Versatile for tightening and loosening nuts and bolts of various sizes.
- Basin Wrench: A specialized tool with a long shaft and a swiveling jaw, perfect for reaching nuts in tight spaces, especially under sinks.
- Hex Key Set (Allen Wrenches): Many faucets and shower handles use hex screws.
Pliers
- Channel-Lock Pliers (Tongue-and-Groove Pliers): Excellent for gripping irregular shapes and providing leverage.
- Needle-Nose Pliers: Useful for retrieving small objects from drains or working in confined areas.
Cutting and Cleaning Tools
- Pipe Cutter: Essential for making clean, straight cuts on copper or PVC pipes.
- Hacksaw: For cutting through various materials, including metal pipes and bolts.
- Plunger (Flange and Cup): A flange plunger is ideal for toilets, while a cup plunger works best for sinks and tubs. Having both is a smart move for your DIY plumbing essentials.
- Drain Snake/Auger: For clearing stubborn clogs beyond the reach of a plunger.
- Wire Brush: For cleaning pipe ends before soldering or applying sealants.
Sealing and Measuring
- Plumber’s Putty: A pliable, waterproof sealant used around drains and faucets.
- PTFE Thread Seal Tape (Teflon Tape): Essential for sealing threaded pipe connections to prevent leaks.
- Caulk Gun and Silicone Caulk: For sealing gaps around fixtures and preventing water intrusion.
- Measuring Tape: For accurate measurements when cutting pipes or replacing parts.
Safety and Miscellaneous
- Work Gloves: Protect your hands from grime, chemicals, and sharp edges.
- Safety Glasses: Crucial for protecting your eyes from splashes and debris.
- Flashlight or Headlamp: Plumbing work often takes place in dark, confined spaces.
- Bucket and Rags: For catching drips and cleaning up spills.
Having these DIY plumbing essentials readily available will significantly reduce the panic and downtime when a minor plumbing issue arises. Organize them in a dedicated toolbox so you can quickly grab what you need.
Common DIY Plumbing Repairs You Can Tackle
With your toolkit ready, let’s explore some of the most frequent plumbing problems homeowners encounter and how you can fix them. These are prime examples of where your DIY plumbing essentials will shine.
1. Fixing a Leaky Faucet
A dripping faucet isn’t just annoying; it wastes water and can lead to higher utility bills. Most leaky faucets are caused by worn-out washers, O-rings, or cartridges. The repair process varies slightly depending on the type of faucet (compression, cartridge, ceramic disc, or ball), but the general principle is the same: replace the faulty internal component.
- Turn off the water supply: Locate the shut-off valves under the sink and turn them clockwise until the water stops. If there are no individual valves, you’ll need to turn off the main water supply to your house.
- Disassemble the faucet: Remove decorative caps, unscrew handles, and carefully detach the components to access the internal mechanism.
- Identify and replace the worn part: Examine washers, O-rings, or the cartridge for signs of wear. Take the old part to a hardware store to ensure you get an exact match.
- Reassemble the faucet: Put everything back together in reverse order, being careful not to overtighten.
- Turn on the water: Slowly turn the water supply back on and check for leaks.
This repair is a classic use for your adjustable wrench and possibly needle-nose pliers from your DIY plumbing essentials kit.
2. Clearing a Clogged Drain
Slow or stopped drains are among the most common plumbing nuisances. Before reaching for harsh chemical drain cleaners (which can damage pipes over time), try these DIY methods:
- Plunger Power: For sinks and tubs, ensure there’s enough water to cover the plunger’s cup. Create a tight seal and plunge vigorously. For toilets, use a flange plunger and ensure a good seal before plunging.
- Remove the P-Trap: For sink clogs, the P-trap (the U-shaped pipe under the sink) is often the culprit. Place a bucket underneath, unscrew the slip nuts, and carefully remove the trap. Clean out any debris. This is where your channel-lock pliers will be invaluable.
- Drain Snake/Auger: If the clog is further down, a drain snake can be inserted into the drain opening (or after removing the P-trap). Crank the handle to feed the snake until you hit the clog, then rotate it to break up or pull out the obstruction.
Remember, prevention is key. Avoid pouring grease down drains and use drain screens to catch hair and food particles.
3. Silencing a Running Toilet
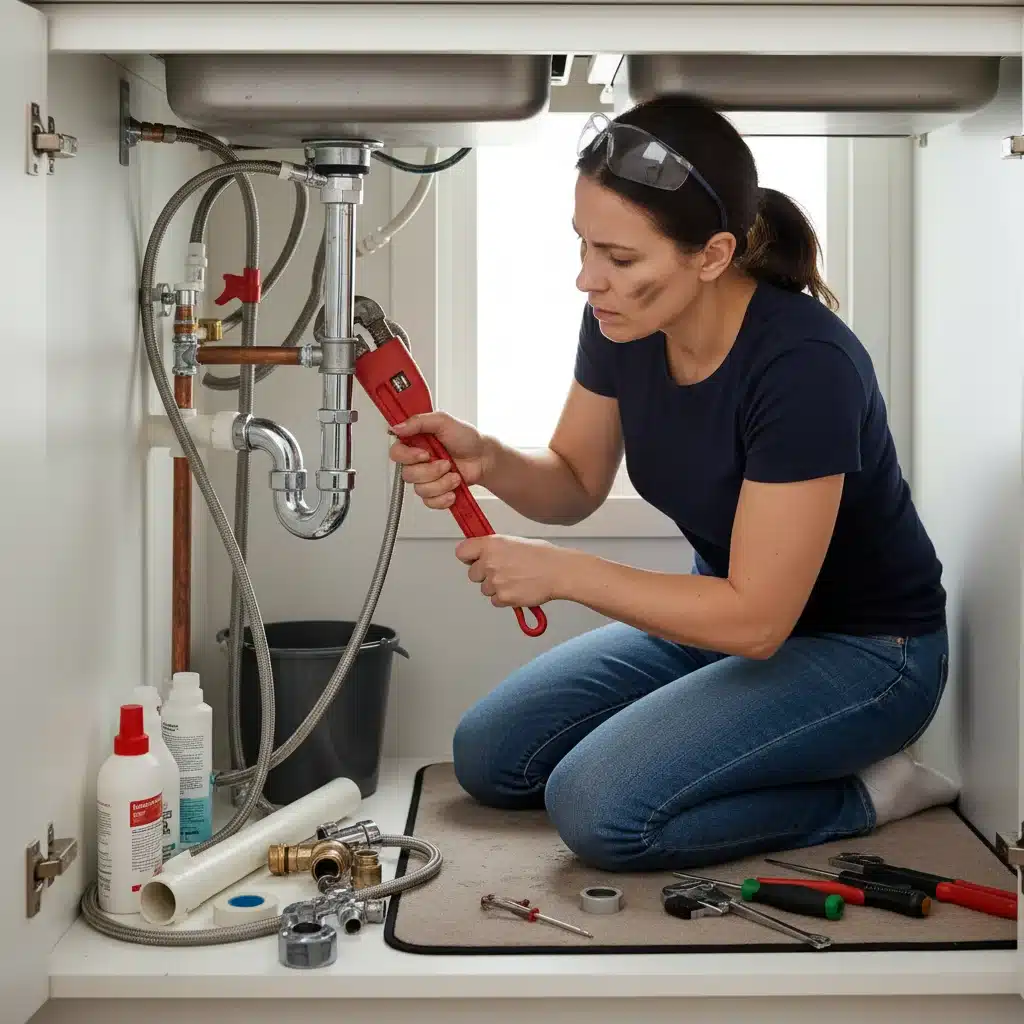
A toilet that runs continuously wastes an incredible amount of water. Most running toilet issues stem from problems within the tank mechanism. Your DIY plumbing essentials will be useful here.
- Remove the tank lid: Observe the internal components.
- Check the Flapper: The flapper is the rubber or plastic seal at the bottom of the tank. If it’s worn, warped, or not sealing properly, water will continuously leak into the bowl. Replace it if necessary.
- Adjust the Fill Valve: The fill valve controls the water level in the tank. If the water level is too high, it can flow into the overflow tube. Adjust the float mechanism so the water stops about an inch below the top of the overflow tube.
- Examine the Chain: Ensure the chain connecting the flush lever to the flapper has the right amount of slack. Too tight, and the flapper won’t seal; too loose, and it might get caught.
These simple adjustments can often resolve a running toilet without needing a professional.
4. Stopping a Leaky Pipe Joint
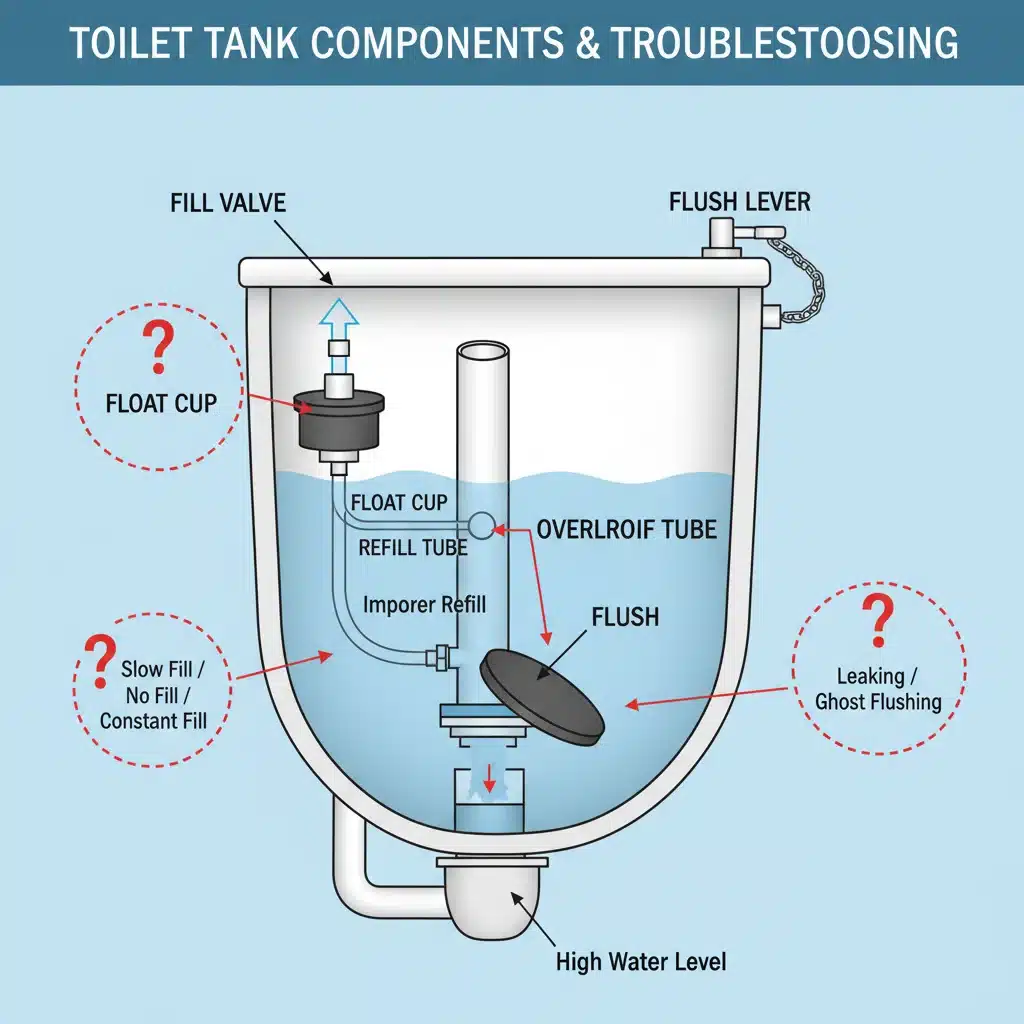
A small drip from a pipe joint can escalate quickly if not addressed. For threaded connections, the solution often involves re-taping or re-doping the threads.
- Turn off the water: Locate the nearest shut-off valve or the main water supply.
- Drain the pipe: Open a nearby faucet to relieve pressure and drain water from the affected section.
- Disassemble the joint: Use your pipe wrenches or adjustable wrenches to carefully loosen and separate the leaking joint.
- Clean and prepare: Thoroughly clean the threads of both pipes. Remove any old tape or sealant.
- Apply new sealant: Wrap 2-3 layers of PTFE thread seal tape clockwise around the male threads. Alternatively, apply pipe joint compound (pipe dope) to the threads.
- Reassemble and test: Tighten the joint securely, turn the water back on slowly, and check for leaks. Do not overtighten, as this can damage the threads.
This is a perfect scenario for your PTFE thread seal tape and pipe wrenches from your DIY plumbing essentials.
Advanced DIY Plumbing: When to Call a Pro
While many minor issues are within the scope of a capable DIYer, it’s equally important to recognize when a problem warrants professional intervention. Attempting complex repairs without the necessary skills or tools can lead to more significant damage, higher costs, and even safety hazards.
When to Consult a Professional Plumber:
- Major Leaks or Burst Pipes: If you have a significant leak that you can’t quickly contain or a burst pipe, immediately shut off your main water supply and call a plumber. These situations can cause extensive water damage in a short amount of time.
- No Water or Low Water Pressure Throughout the House: This could indicate a major issue with your main water line, a pressure regulator problem, or even a community-wide issue.
- Sewer Backups: If sewage is backing up into multiple drains or fixtures, it suggests a blockage in your main sewer line. This is a serious health hazard and requires professional equipment to clear.
- Water Heater Problems: While some water heater issues like a pilot light going out can be DIY, anything involving gas lines, significant leaks, or heating element replacement is best left to a professional due to safety risks.
- Gas Leaks: If you smell gas, evacuate your home immediately and call your gas company and/or emergency services. Never attempt to fix a gas leak yourself.
- Persistent or Recurring Problems: If you’ve tried to fix a problem multiple times and it keeps coming back, there might be an underlying issue that only a professional can properly diagnose and rectify.
- New Installations or Major Renovations: Installing new plumbing lines, relocating fixtures, or undertaking major bathroom/kitchen renovations usually requires permits and adherence to building codes, which are best handled by licensed plumbers.
- Lack of Confidence or Experience: If you feel uncomfortable or unsure about a particular repair, it’s always safer and often more cost-effective in the long run to call a professional.
Knowing your limits is a crucial part of effective DIY plumbing. Don’t hesitate to seek expert help when the situation calls for it. A professional plumber has specialized tools, extensive experience, and the necessary certifications to handle complex and potentially dangerous tasks.
Preventative Maintenance: Keeping Your Plumbing Healthy
The best way to deal with plumbing problems is to prevent them from happening in the first place. Regular maintenance can significantly extend the life of your plumbing system and reduce the frequency of costly repairs. Incorporate these habits into your home maintenance routine:
- Be Mindful of What Goes Down Drains: Avoid pouring grease, coffee grounds, hair, and non-biodegradable items down your drains. Use drain screens in sinks and showers.
- Regularly Flush Your Water Heater: Sediment can build up in your water heater tank, reducing efficiency and lifespan. Flush it annually to remove sediment.
- Check for Leaks Periodically: Inspect under sinks, around toilets, and near appliances for any signs of moisture or drips. Even small leaks can waste water and lead to mold growth.
- Know Where Your Shut-Off Valves Are: Locate and periodically test your main water shut-off valve and individual fixture shut-off valves to ensure they are working and you know how to operate them in an emergency.
- Insulate Exposed Pipes: In colder climates, insulate pipes in unheated areas (like basements, attics, or exterior walls) to prevent freezing and bursting.
- Address Small Issues Promptly: A minor drip today can become a major leak tomorrow. Don’t procrastinate on small repairs.
- Use Water Softeners (if needed): If you have hard water, a water softener can prevent mineral buildup in pipes and appliances, extending their life.
By actively maintaining your plumbing system, you’ll not only prevent emergencies but also ensure the longevity and efficiency of one of your home’s most vital systems. These preventative measures are just as important as having your DIY plumbing essentials at the ready.
Safety First: Essential Tips for DIY Plumbing
Plumbing work, even minor repairs, involves water, electricity (sometimes), and potentially hazardous materials. Always prioritize safety:
- Turn Off Water Supply: This is the golden rule. Always shut off the water to the specific fixture or the entire house before starting any work.
- Wear Protective Gear: Safety glasses are a must to protect against splashes and debris. Gloves protect your hands from dirt, chemicals, and sharp edges.
- Ensure Good Ventilation: If you’re using solvents, glues, or strong cleaning agents, make sure the area is well-ventilated.
- Beware of Electricity: Never mix water and electricity. If working near electrical outlets or appliances, ensure they are turned off or unplugged.
- Avoid Overtightening: When tightening connections, be firm but avoid overtightening, which can strip threads or crack pipes and fixtures.
- Read Instructions: Always read the instructions for any new parts, tools, or chemical products you are using.
- Have a Bucket and Rags Handy: Even with the water off, there might be residual water in pipes. Be prepared for drips and spills.
- Don’t Force It: If a part isn’t coming loose easily, don’t force it. You might damage the fixture or pipe. Re-evaluate your approach or consider professional help.
Following these safety guidelines will help ensure your DIY plumbing projects are completed without incident.
Conclusion: Empowering Your Inner Plumber
Embarking on DIY plumbing essentials projects can be incredibly rewarding. It provides a sense of accomplishment, saves money, and gives you a deeper understanding of your home. By stocking your toolbox with the right DIY plumbing essentials, understanding the basics of your home’s water system, and learning how to tackle common repairs, you’ll be well-equipped to handle many of the challenges that arise.
Remember, while self-reliance is admirable, knowing when to call a professional is a sign of wisdom, not weakness. For major issues, complex installations, or when in doubt, don’t hesitate to reach out to a licensed plumber. With a balanced approach of DIY effort and professional consultation, you can ensure your home’s plumbing system remains in excellent working order for years to come. Start small, build your confidence, and soon you’ll be mastering your home’s plumbing like a pro!